
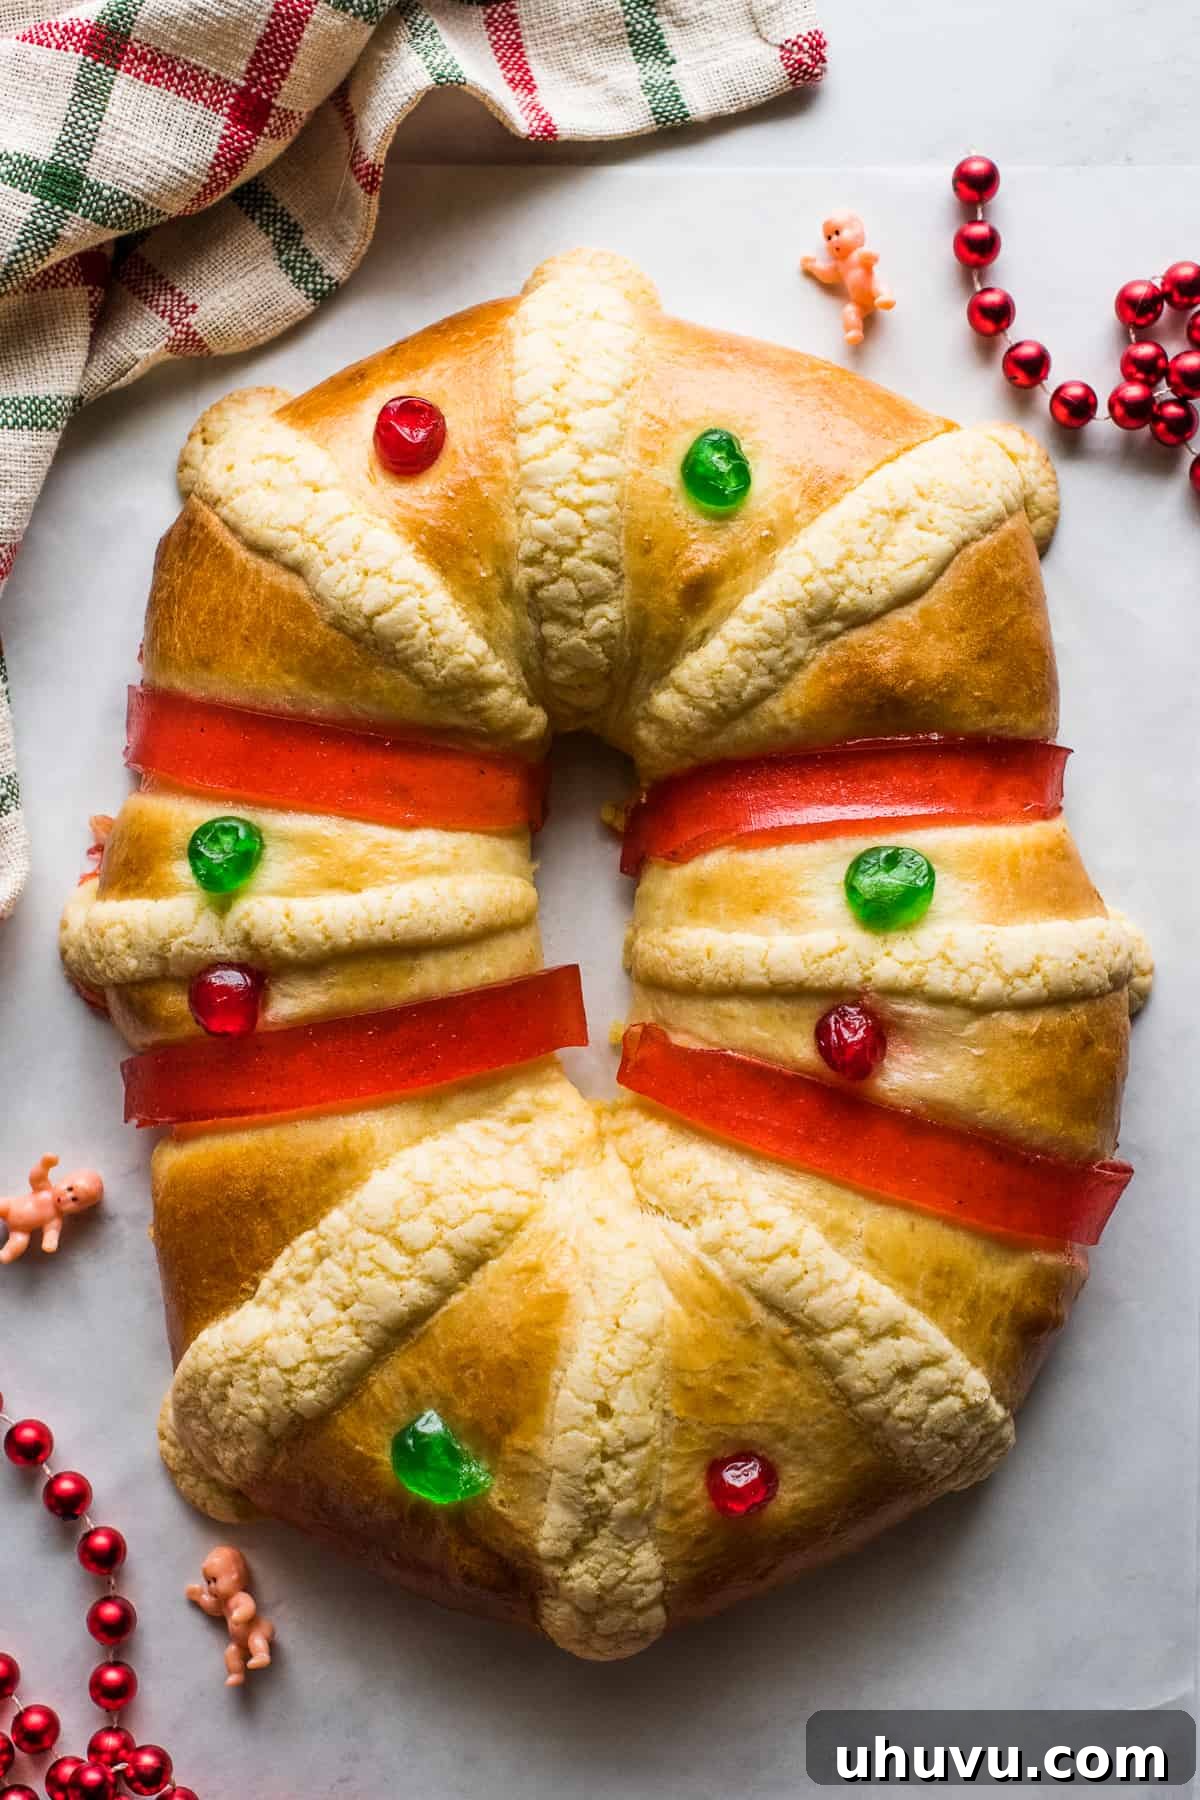
Rosca de Reyes: A Culinary Journey into Mexico’s Three Kings Bread Tradition
Rosca de Reyes, often translated as Three Kings Bread, is a magnificent, soft, and sweet bread, delicately flavored with orange, that holds a cherished place in Mexican culture. It is traditionally baked and enjoyed to commemorate Three Kings Day, also known as Epiphany, a significant Christian feast celebrated on January 6th. This festive brioche-like pastry is more than just a dessert; it’s a centerpiece of family gatherings, rich in symbolism and delicious flavors. Pair a slice of this beautiful bread with a warm cup of champurrado, a thick Mexican hot chocolate, or a comforting café de olla for a truly authentic experience.
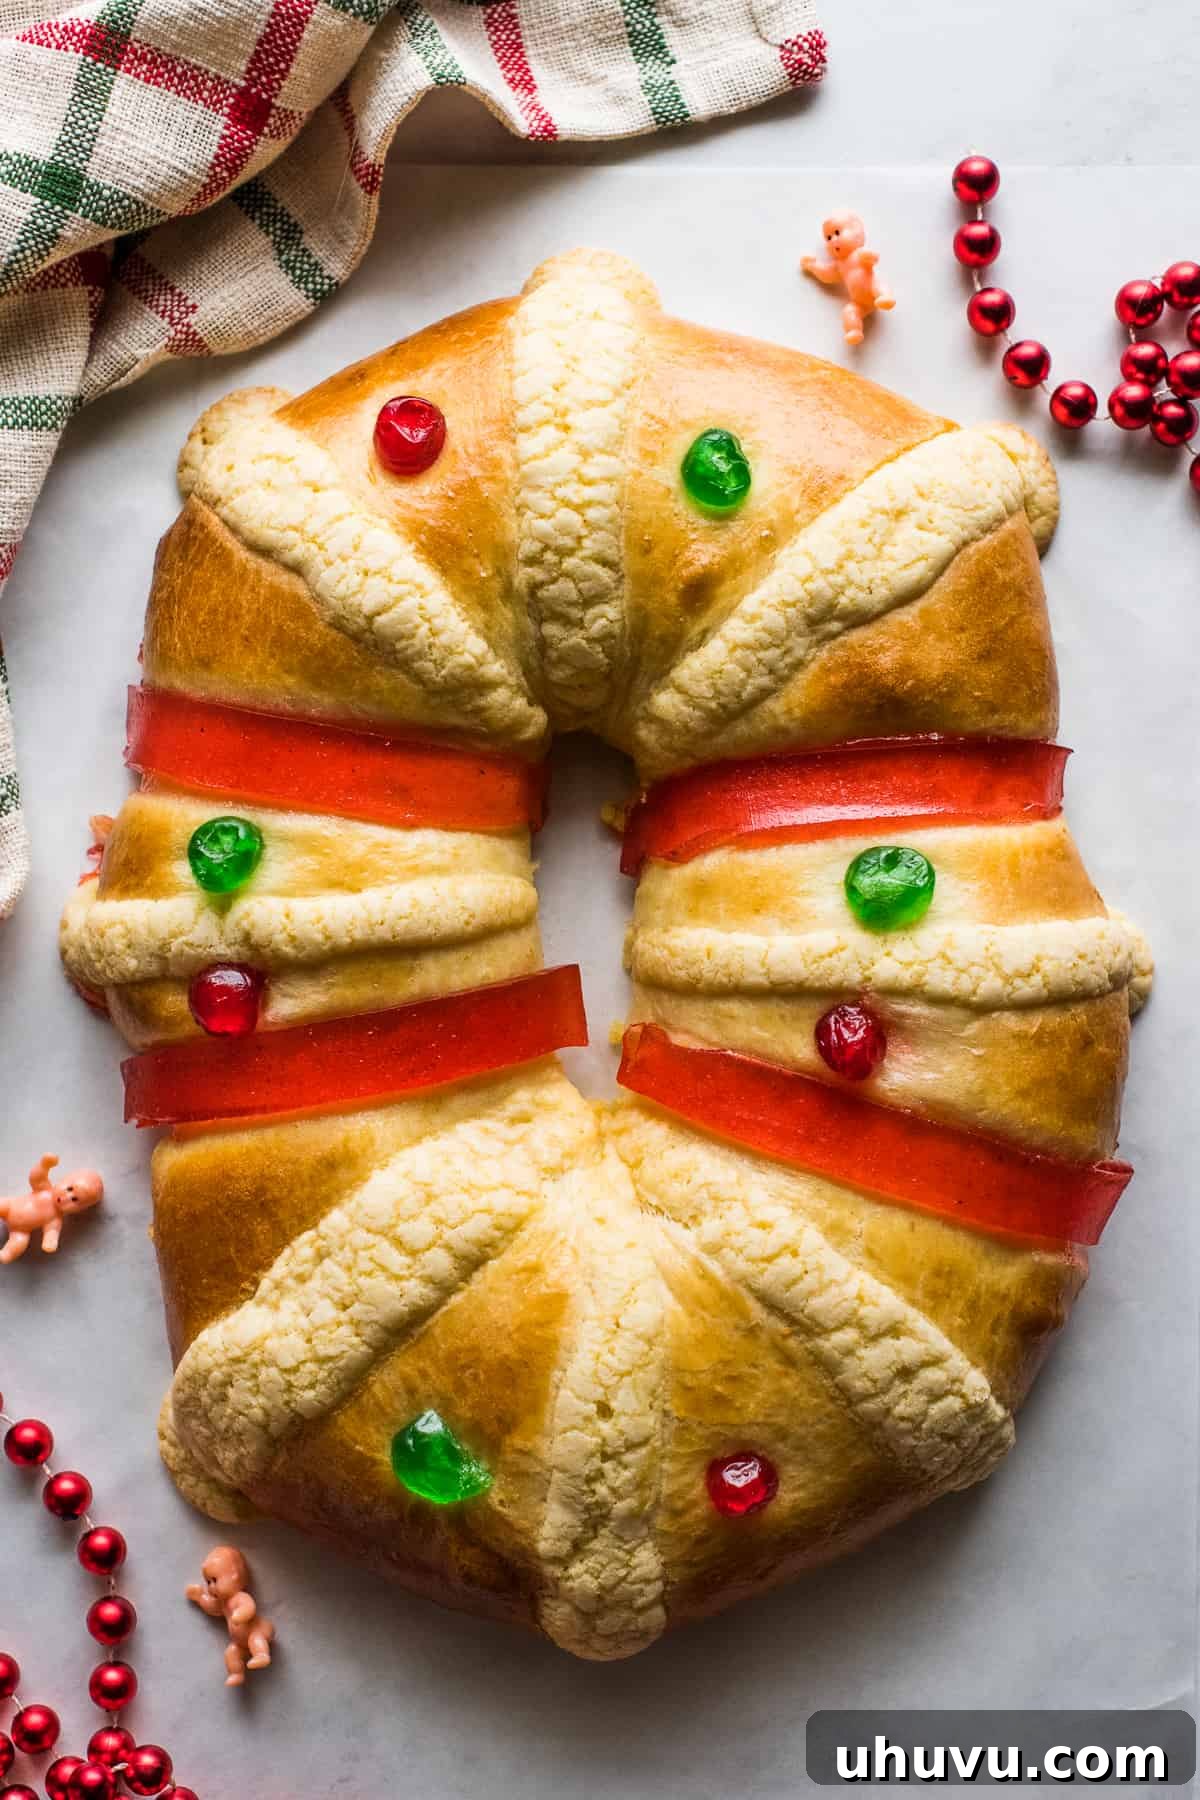
What is Rosca de Reyes? Unveiling the Festive Three Kings Cake
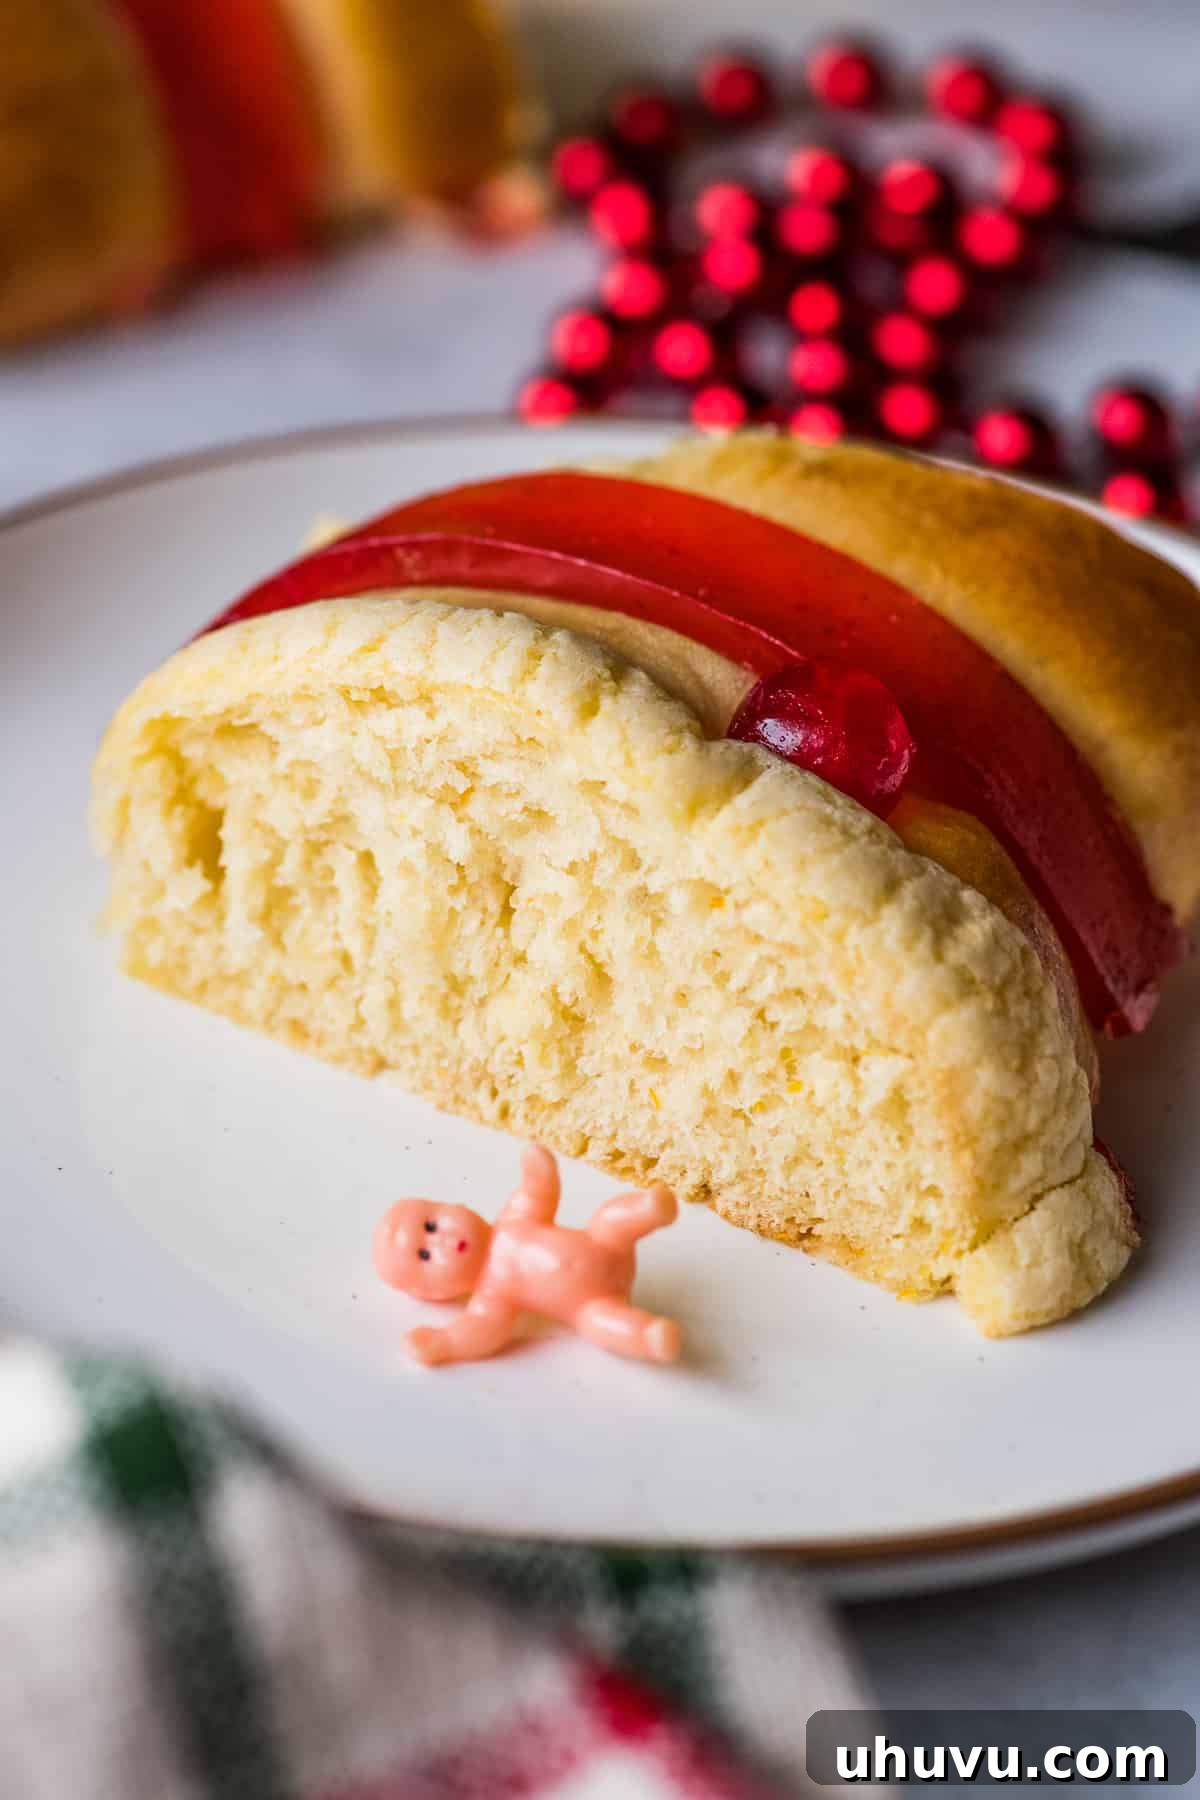
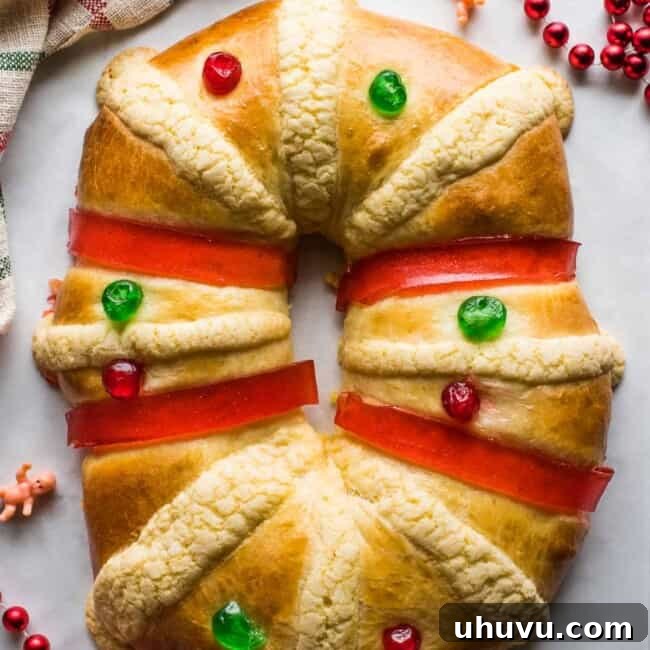
A Rosca de Reyes, colloquially known as Three Kings Cake, is a truly exquisite sweet bread that delights both the palate and the eye. Its texture is wonderfully soft and buttery, infused with a subtle yet distinct hint of fresh orange. Typically crafted into a round or oval wreath shape, symbolizing a crown and the eternal love of God, it serves as a festive culinary masterpiece.
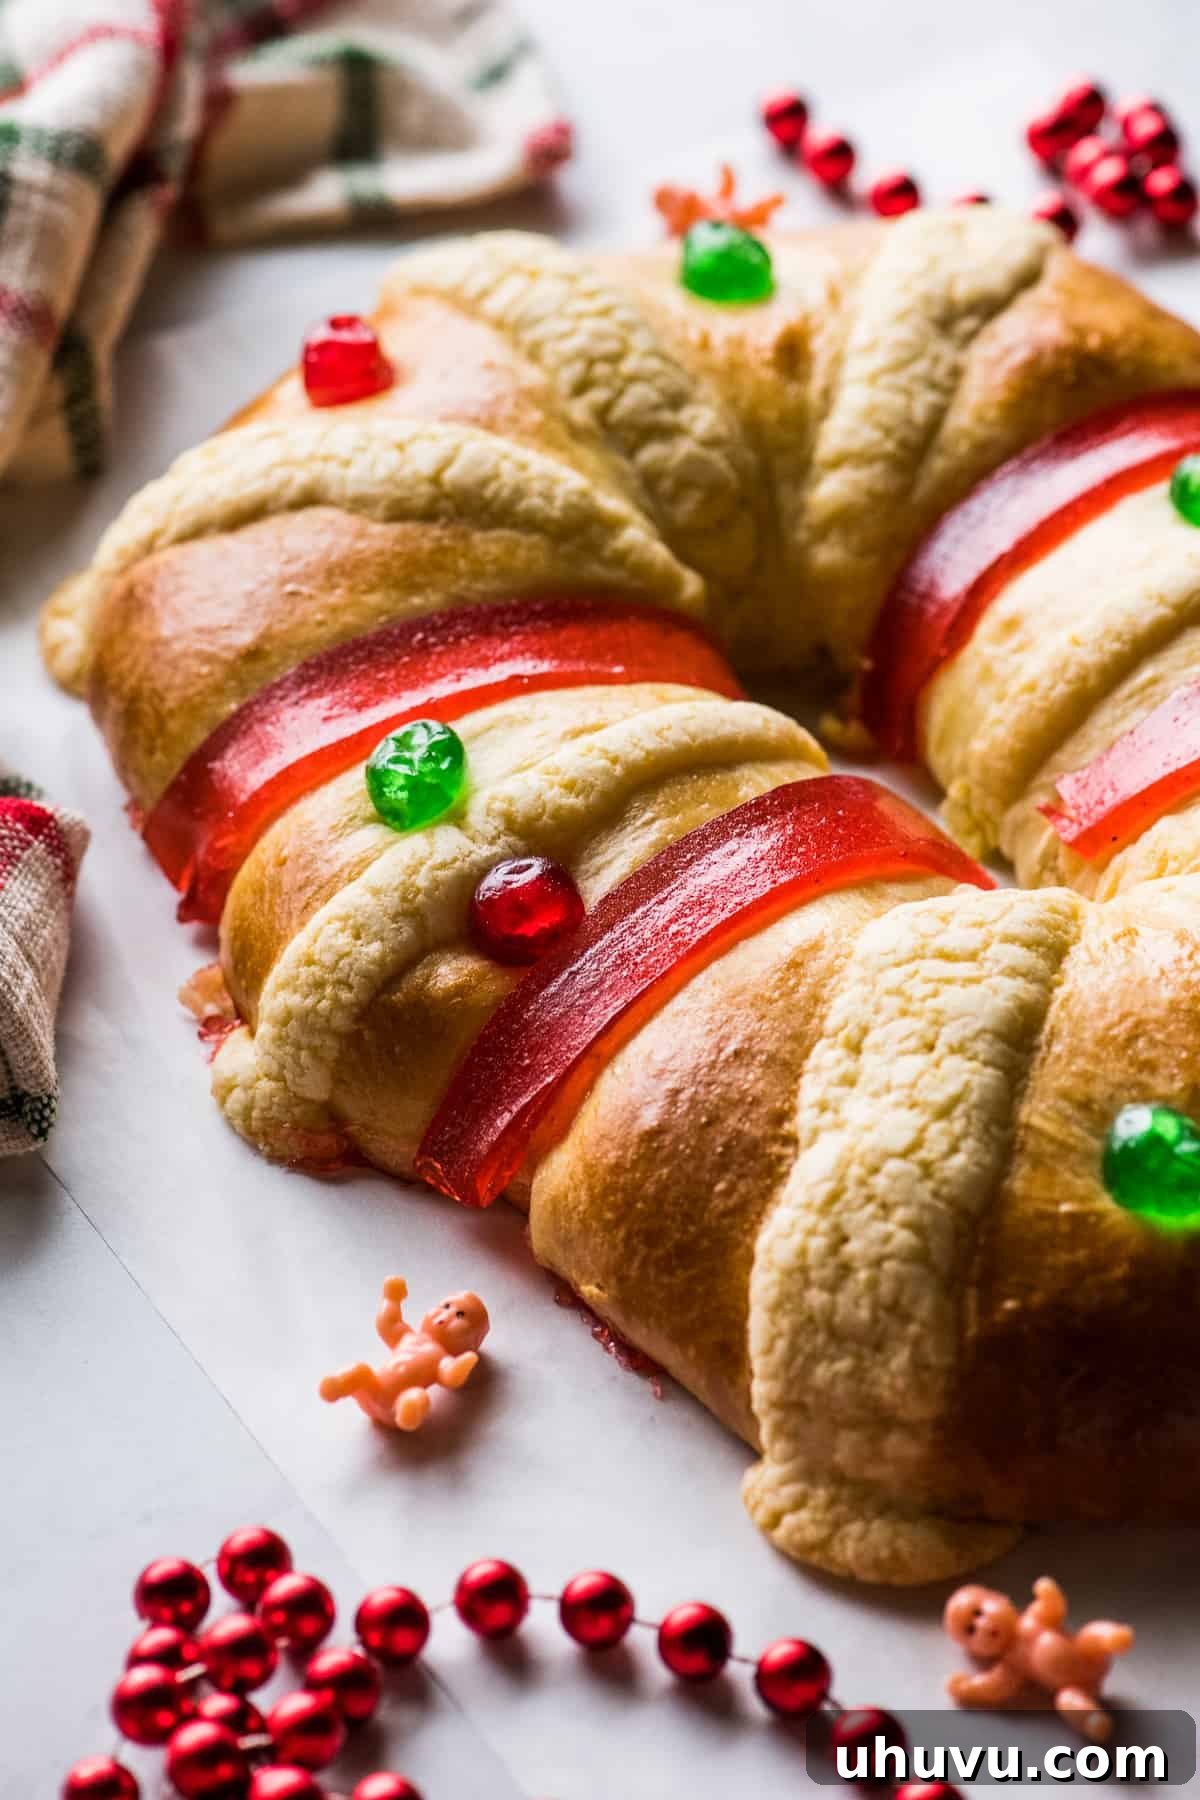
The bread is lavishly decorated with an array of vibrant toppings, including bright red and green candied cherries, strips of luscious guava or quince paste (membrillo), and a sweet, streusel-like sugar topping. Each element adds to its visual appeal and contributes a unique flavor and texture, making every bite a delightful experience. The decorations often represent the jewels on a king’s crown, further enhancing its regal association.
This cherished pastry is an integral part of celebrating the Christian feast day of Epiphany on January 6th. This day, widely known as Three Kings Day (Día de Reyes), commemorates the biblical story of the Three Wise Men, or Magi, who journeyed to Bethlehem to visit the newborn Baby Jesus, offering him precious gifts of gold, frankincense, and myrrh. The Rosca de Reyes tradition beautifully reenacts this journey and the presentation of gifts.
In a charming Mexican tradition, one to three small figurines, representing the Baby Jesus, are carefully hidden within the bread before baking. On Epiphany, families and friends gather together, eagerly cutting slices of this delicious bread. The anticipation builds with each slice, as whoever finds a Baby Jesus figurine in their piece is bestowed with a special responsibility: they must host and prepare tamales for the entire family on February 2nd for Día de la Candelaria, or Candlemas. This unique custom adds an element of playful suspense and communal joy to the celebration, extending the festive season.
Essential Ingredients for Your Rosca de Reyes
- Milk, Active Dry Yeast, and Granulated Sugar: These three form the crucial yeast mixture, the heart of our bread. Ensure your milk is warmed to a specific temperature, between 110°F-115°F, to optimally activate the dry yeast. The sugar isn’t just for sweetness here; it also provides nourishment, helping the yeast to bloom and create that wonderfully airy texture.
- Bread Flour and All-Purpose Flour: The secret to Rosca de Reyes’ signature soft and pillowy texture lies in this specific blend. Bread flour contributes to the bread’s chewiness and structure due, to its higher protein content, while all-purpose flour ensures tenderness and lightness. Together, they create a balanced and delightful crumb.
- Fresh Orange Zest: For an authentic and vibrant citrus note, I highly recommend using fresh orange zest over artificial orange extract. The zest provides a far more potent, natural, and aromatic orange flavor that truly elevates the bread’s profile. Don’t skip this for the best results!
- Unsalted Butter, Salt, and Eggs: These are the fundamental building blocks of any great baked good. High-quality unsalted butter enriches the dough, providing a delicate richness and tender crumb. Salt balances the sweetness and enhances all the flavors, while eggs add essential moisture, bind the ingredients, and contribute to the bread’s overall structure and golden hue.
- Neutral Oil: A neutral-flavored oil, such as canola, avocado, or a light olive oil, is ideal for greasing the proofing bowl. This prevents the dough from sticking and allows it to rise unhindered, creating a beautiful, smooth surface.
- Traditional Decorations and Toppings: The beauty of Rosca de Reyes is in its festive adornments. You’ll need guava paste or quince (membrillo) paste, cut into strips for their unique fruity sweetness. Bright candied cherries (red or green) add pops of color and a chewy texture. And, of course, the charming little baby Jesus figurines are essential for the traditional game. These can often be found at local Hispanic grocery stores or online.
Crafting Your Own Rosca de Reyes: A Step-by-Step Guide
Creating Rosca de Reyes is a delightful and rewarding process. Follow these steps to bring this festive tradition into your home:
Step 1: Activate the Yeast. Begin by preparing your yeast mixture. In a small bowl, combine warmed milk (ensure it’s between 110°F-115°F), active dry yeast, and 1 tablespoon of granulated sugar. Stir gently to combine, then lightly cover the bowl and let it rest for 5 minutes. You’ll know the yeast is active and ready when the mixture becomes bubbly and frothy on the surface.
Step 2: Combine Dry Ingredients. While the yeast is blooming, in the bowl of your stand mixer, lightly whisk together the bread flour, all-purpose flour, the remaining granulated sugar, and fine salt. This ensures even distribution of all dry components.
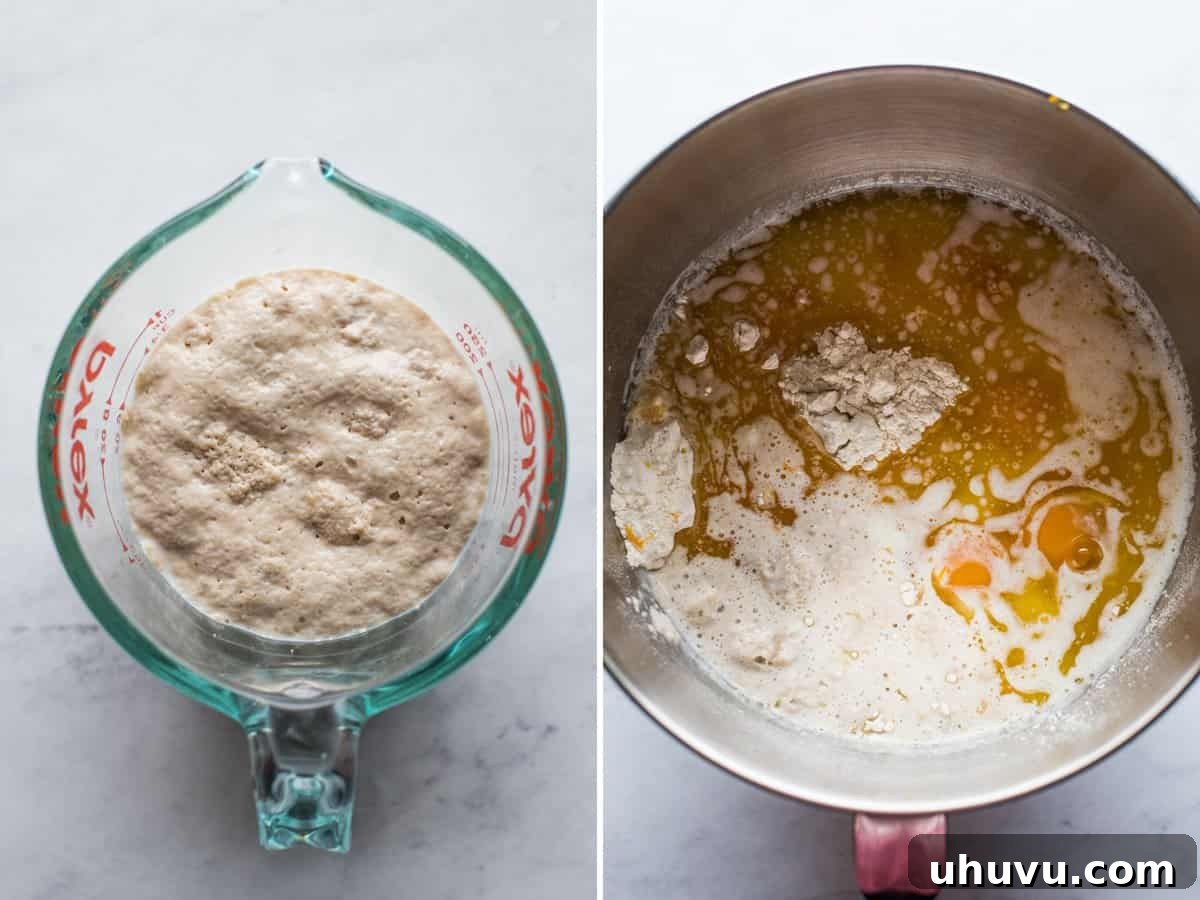
Step 3: Mix the Dough. Once the yeast mixture is beautifully foamy, add it to the stand mixer bowl along with the eggs, melted butter, and fresh orange zest. Attach the dough hook attachment and mix on medium-low speed for 6-8 minutes. The goal is to achieve a dough that is smooth, elastic, and pulls away cleanly from the sides of the bowl. If you find the dough is still too sticky, add 1 tablespoon of all-purpose flour at a time, mixing until it reaches the desired consistency. Avoid adding too much flour, as this can result in a dry bread.
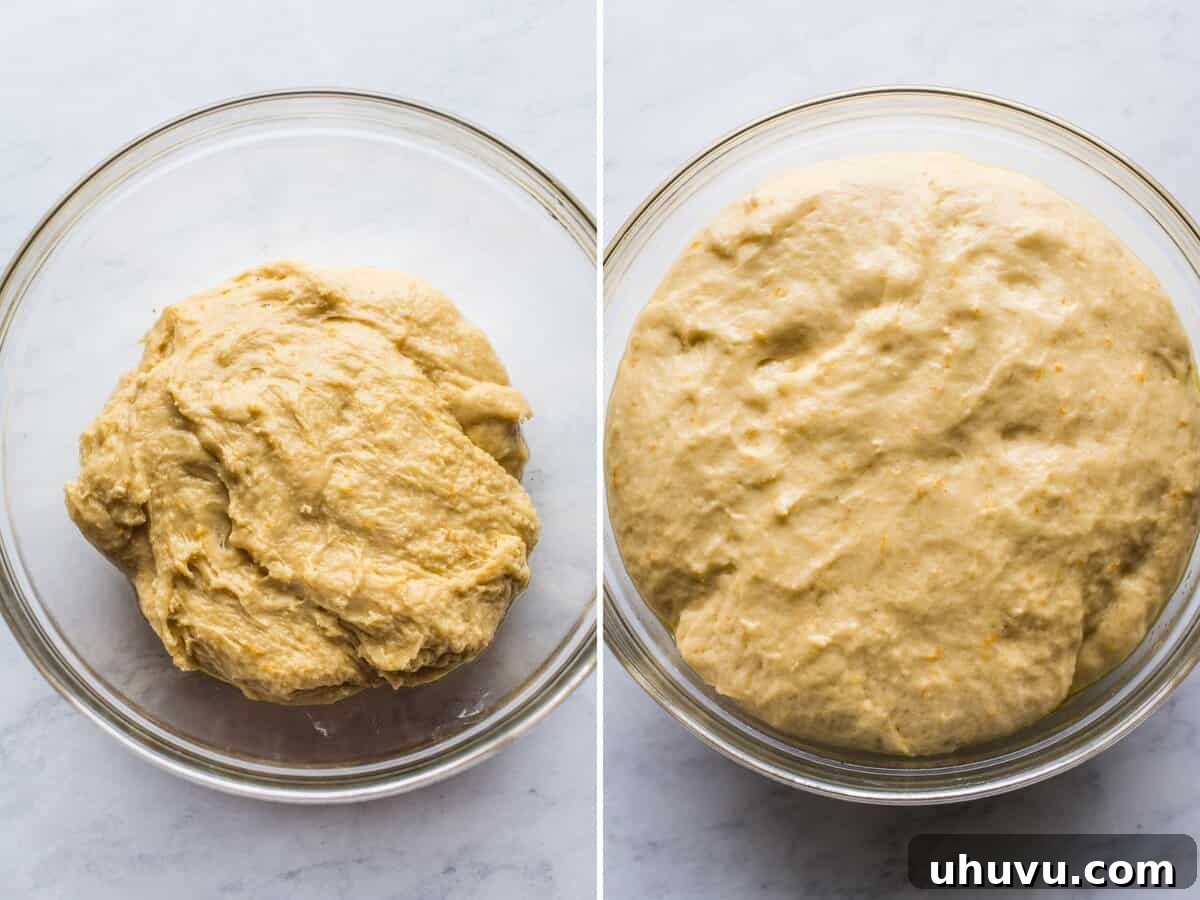
Step 4: First Rise (Proofing). Lightly coat a large bowl with a neutral oil. Transfer the dough to this oiled bowl, turning it once to ensure it’s evenly coated. Cover the bowl snugly with a clean kitchen towel or plastic wrap, and allow the dough to rise in a warm, draft-free place for 60-90 minutes, or until it has visibly doubled in size. This first rise is crucial for developing the bread’s flavor and texture.
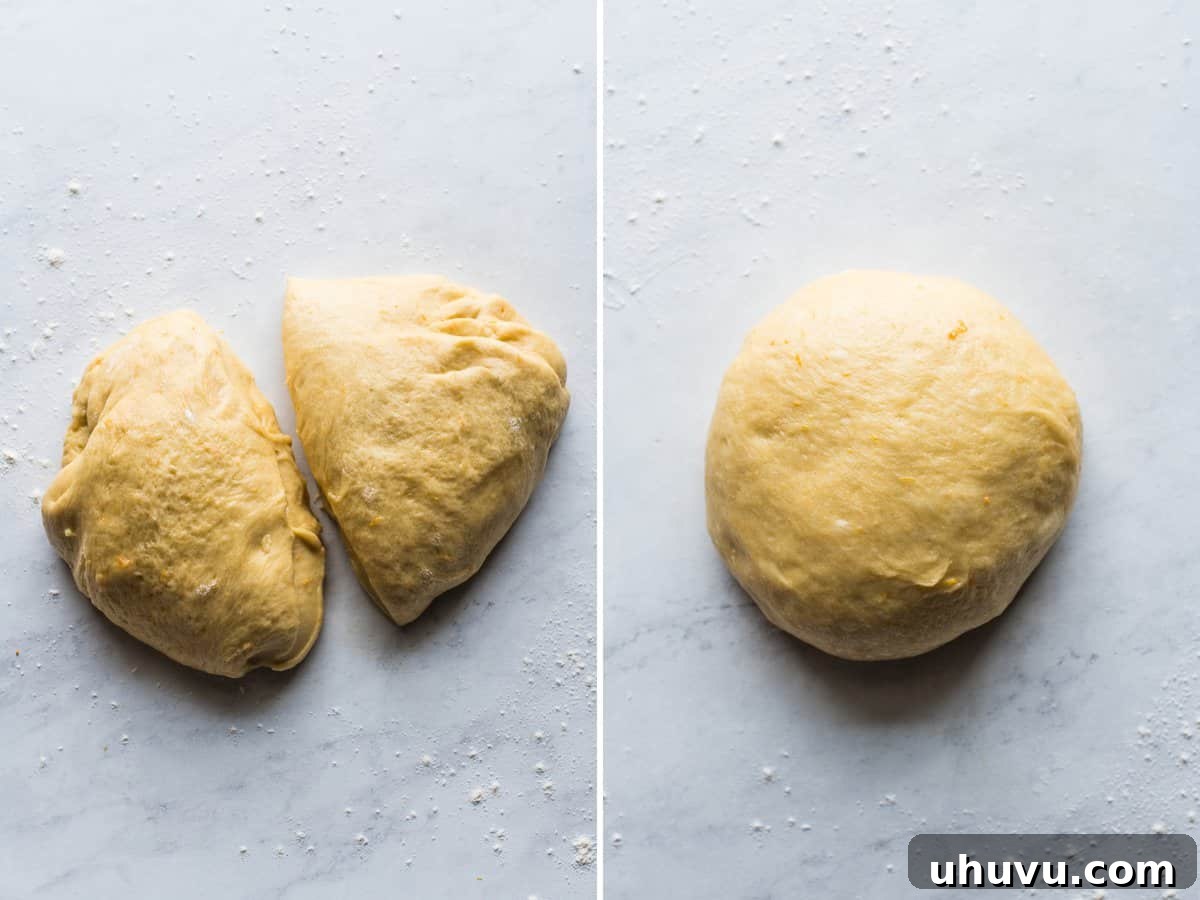
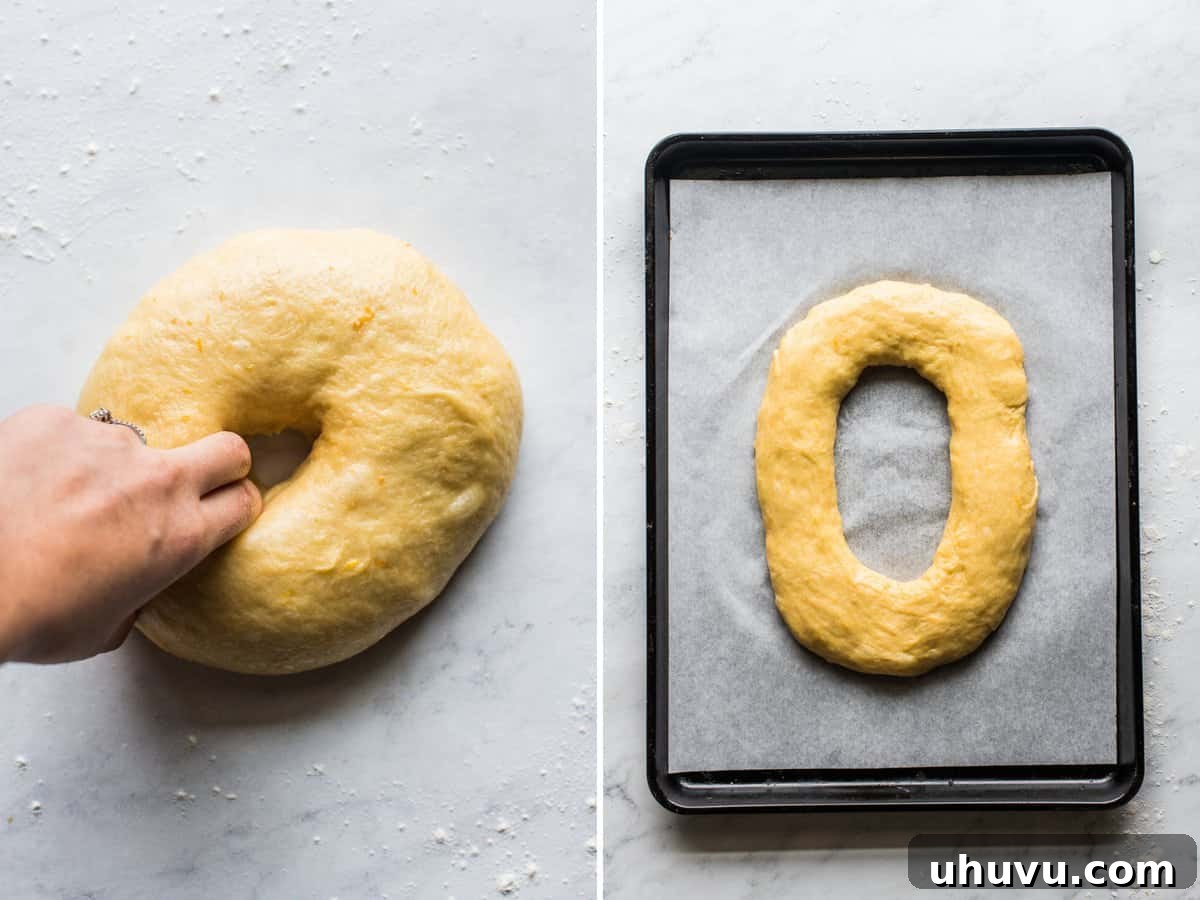
Step 5: Divide and Shape. Once the dough has completed its first rise, gently punch it down to release the air. Divide the dough into two equal halves. Take each half and roll it into a smooth ball. Now, create the characteristic wreath shape: insert your fingers into the center of each dough ball and gently stretch outwards to form a hole. Continue to lightly stretch and pull the dough to create a large oval-shaped ring, approximately 10.5 x 7.5 inches in size. Repeat this shaping process for the second dough ball.
Step 6: Second Rise. Carefully transfer the two shaped dough wreaths onto two separate baking sheets that have been lined with parchment paper. Cover them loosely with a kitchen towel or plastic wrap once more, and allow them to rise for an additional 45 minutes. This second proofing will give the roscas their final airy volume before baking.
Step 7: Prepare the Sugar Paste. While your dough is undertaking its second rise, prepare the decorative sugar paste. In a medium bowl, combine the egg yolk, all-purpose flour, confectioners’ sugar, and softened unsalted butter. Beat these ingredients together until they are thoroughly combined and form a smooth, thick paste. Once mixed, divide this paste into 16 equal pieces, shape them into thin strips, and refrigerate them until you’re ready to decorate. Chilling helps them maintain their shape.
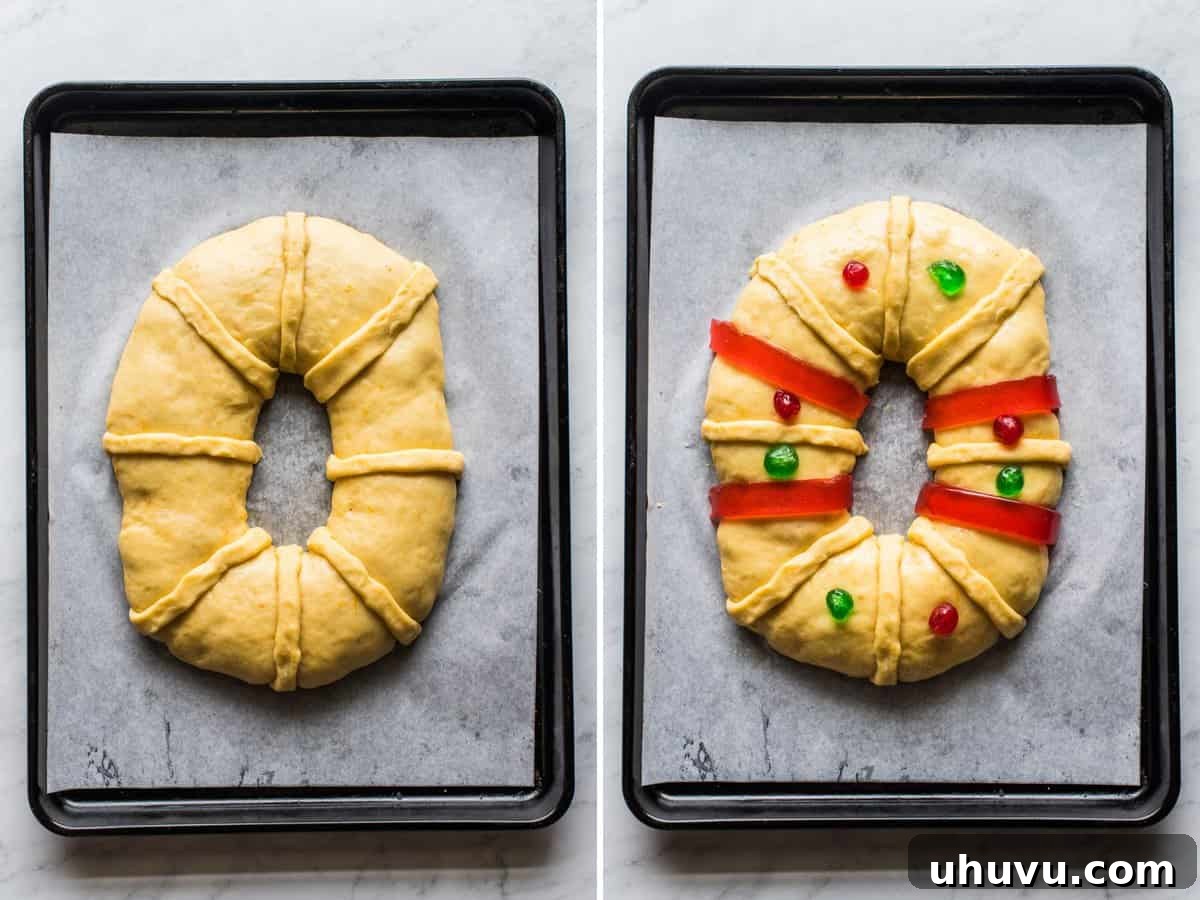
Step 8: Decorate the Rosca. Once the dough has completed its second rise, it’s time for the artistic touch! First, preheat your oven to 350°F (175°C) and arrange the oven racks to the middle and top positions. Make the egg wash by whisking one egg and one tablespoon of milk together in a small bowl. Gently brush this egg wash generously over the surface of each rosca. Retrieve the chilled sugar paste strips from the refrigerator and arrange 8 strips evenly spaced across each rosca. Next, place the strips of guava or quince paste in the empty spaces, followed by the vibrant candied cherries, arranging them to your aesthetic preference. This step is where your Rosca de Reyes truly comes to life!
Step 9: Bake to Golden Perfection. Place the decorated roscas in the preheated oven. Bake for approximately 25 minutes. To ensure even baking and a beautiful golden-brown finish on both roscas, remember to swap the location of the baking sheets (top to bottom, bottom to top) and rotate them halfway through the baking time. The bread is fully cooked when the tops are deeply golden brown and a thermometer inserted into the thickest part reads around 200-210°F (93-99°C). Once baked, remove them from the oven and allow them to cool on a wire rack for at least 30 minutes. This cooling period is essential for the bread to set and for flavors to fully develop.
Step 10: Hide the Figurines and Serve! Once the roscas have cooled sufficiently, it’s time for the final, most exciting step: hiding the Baby Jesus figurines! Gently insert 1 to 3 small figurines into the bottom of each rosca, pushing them discreetly into the bread. Now your Rosca de Reyes is complete and ready to be shared and enjoyed with family and friends, sparking joy and continuing a beautiful tradition!
Helpful Tips for a Flawless Rosca de Reyes
- Decorate with Variety: While candied cherries, guava, and quince paste are traditional, feel free to experiment with other candied fruits. Rosca de Reyes can also be adorned with candied orange peels or candied citron. Use whatever colorful and flavorful candied fruits you can easily find to make your rosca uniquely beautiful.
- Embrace Fresh Orange Zest: As mentioned in the ingredients, prioritizing fresh orange zest over artificial orange extract is key. It imparts a much stronger, more authentic, and superior orange flavor that truly distinguishes this bread. The natural oils in the zest provide a fragrant aroma and taste that extract simply cannot replicate.
- Ensure Even Baking: When baking two roscas simultaneously, especially in a home oven, even heat distribution is vital. To achieve a uniform golden brown crust and ensure both breads are cooked through, remember to swap and rotate your two baking sheets halfway through the baking time. This prevents one rosca from browning too quickly or unevenly.
- Dough Consistency is Key: Pay close attention to the dough’s texture during mixing. It should be smooth, elastic, and pull away from the bowl. If it feels too sticky, add flour one tablespoon at a time, mixing thoroughly after each addition until the desired consistency is achieved. An overly sticky dough can be difficult to shape, while too much flour will result in a dry and dense bread.
- Proofing Environment: For optimal rising, ensure your dough is proofing in a warm, draft-free environment. Cold temperatures can significantly slow down or halt yeast activity. A slightly warmed oven (turned off, with just the light on) or a sunny spot can work wonders.
Frequently Asked Questions About Rosca de Reyes
Finding a Baby Jesus figurine in your slice of Rosca de Reyes is a cherished and fun tradition! It signifies that you are designated to host and prepare tamales for the entire family on February 2nd. This date marks Día de la Candelaria, or Candlemas, another important religious holiday in Mexico. It’s a delightful way to extend the holiday celebrations and fosters a sense of community and shared responsibility within families.
Rosca de Reyes is traditionally eaten on January 6th. This day is observed as Epiphany, also known as Three Kings Day (Día de Reyes), which celebrates the arrival of the Three Wise Men to visit the Baby Jesus. It is a day of gift-giving and family gatherings, making the Rosca de Reyes a central part of the festive meal.
While both Rosca de Reyes and King’s Cake share similar traditions of celebrating Epiphany and often include a hidden figurine, they have distinct cultural origins and appearances. Rosca de Reyes originates from Spanish and Mexican traditions, featuring a soft, brioche-like bread decorated with candied fruits, guava or quince paste, and a streusel-like sugar topping. King’s Cake, primarily from French and New Orleans’ Mardi Gras traditions, is typically a brioche dough topped with a sweet icing glaze and decorated with sugar in the traditional Mardi Gras colors: yellow, purple, and green. The symbolism and associated celebrations (Candlemas for Rosca, Mardi Gras for King’s Cake) also differ.
The Rich History and Symbolism of Rosca de Reyes
The tradition of Rosca de Reyes dates back centuries, with roots in medieval Europe, particularly Spain and France. It’s believed to have evolved from pagan customs that celebrated the winter solstice, later adopted and reinterpreted by Christianity to align with the Epiphany. The round or oval shape of the bread is highly symbolic, representing a king’s crown, but also the cyclical nature of the year and the eternal love of God with no beginning or end. The candied fruits adorning the bread are said to symbolize the jewels on the crowns of the Three Wise Men, as well as the earthly pleasures and trials of life. The hidden Baby Jesus figurine represents the flight of the Holy Family from King Herod, who sought to kill the newborn Messiah, and the need to hide Jesus.
When the tradition crossed the Atlantic to Mexico with the Spanish conquistadors, it took on a unique flavor and cultural significance. Mexican families embraced the Rosca de Reyes as a central part of their Epiphany celebrations, incorporating indigenous ingredients and local customs, like the tamales tradition, that have made it uniquely Mexican. This beautiful blend of European and Mesoamerican influences has cemented Rosca de Reyes as a beloved staple of the holiday season.
Serving Your Rosca de Reyes: Perfect Pairings
While Rosca de Reyes is a delicious treat on its own, it truly shines when paired with traditional Mexican beverages. The classic accompaniment is a cup of rich, thick Champurrado, a chocolate-based atole, offering a creamy, comforting contrast to the bread’s sweetness. Another excellent choice is Café de Olla, a spiced coffee brewed with cinnamon and piloncillo (unrefined whole cane sugar), which provides a fragrant and warming companion. For those who prefer a simpler pairing, a classic hot chocolate or even a glass of milk is delightful. Rosca de Reyes makes for a wonderful holiday breakfast, a festive dessert, or a comforting afternoon snack, bringing warmth and joy to any gathering.
Variations and Creative Twists
While the traditional Rosca de Reyes is a masterpiece in itself, many enjoy experimenting with variations to suit different tastes and preferences. Some popular twists include adding various fillings to the bread, such as a rich cream cheese filling, sweet guava paste, chocolate ganache, or even a hazelnut spread for an indulgent treat. For the adventurous baker, experimenting with different types of candied fruits, nuts, or even a citrus glaze can add unique flavors and textures. Some regional variations might incorporate ingredients like dried figs or different types of citrus zest. Whether you stick to the classic or try a creative spin, the essence of Rosca de Reyes — communal celebration and joyful discovery — remains at its heart.
Explore More Festive Recipes
- Pan de Muerto (Day of the Dead Bread)
- Sweet Tamales
- Chicken Tamales
- Champurrado
★
★
★
★
Rosca de Reyes
Isabel Orozco-Moore
2 hours 20 minutes
25 minutes
2 hours 45 minutes
16 slices
Ingredients
For the bread
- ⅔ cup milk
- 2 ¼ teaspoons active dry yeast
- ¾ cup granulated sugar, divided
- 2 ½ cups bread flour
- 2 ½ cups all-purpose flour
- ¼ teaspoon fine salt
- ¾ cup unsalted butter, melted
- 4 large eggs
- zest of 2 medium-large oranges
- 1 teaspoon vegetable oil
For the sugar paste
- 1 egg yolk
- ½ cup all-purpose flour
- ½ cup confectioners’ sugar
- ¼ cup unsalted butter, softened
For the decoration
- 1 egg
- 1 tablespoon milk
- candied cherries
- guava or quince paste, cut into strips
- 1-3 small Baby Jesus figurines
Instructions
-
Make the dough: In a cup or bowl, gently warm the milk in 15-second increments in the microwave or on the stovetop until it’s comfortably warm to the touch. A thermometer should register between 110°F-115°F for optimal yeast activation.
-
Stir in the active dry yeast and 1 tablespoon of the granulated sugar. Mix until just combined, then loosely cover the bowl with plastic wrap and let it stand for 5 minutes. The mixture should become visibly bubbly and foamy, indicating the yeast is perfectly bloomed.
-
In the bowl of a stand mixer, whisk together the bread flour, all-purpose flour, the remaining granulated sugar, and the fine salt until they are evenly distributed.
-
Attach the dough hook to your mixer. Add the melted butter, eggs, fragrant orange zest, and the activated yeast mixture to the bowl. Mix on medium-low speed for 6-8 minutes. Continue mixing until the dough transforms into a smooth, elastic consistency that pulls away cleanly from the sides of the bowl. If the dough remains overly sticky, incorporate 1 tablespoon of all-purpose flour at a time, mixing well after each addition, until the ideal texture is achieved.
-
Generously coat a large bowl with a neutral oil. Transfer the dough into the bowl, shaping it into a neat ball. Cover the bowl securely with a clean kitchen towel or plastic wrap, and allow the dough to rise in a warm, draft-free place for 1 to 1 ½ hours, or until it has visibly doubled in size.
-
While the dough rises, prepare two large baking sheets by lining them with parchment paper, then set them aside.
-
Once the dough has risen, gently punch it down to release the air. Divide the dough into two equal pieces and shape each piece into a smooth ball. Working with one ball at a time, use your fingers to create a hole in the middle. Then, gently pull and stretch the dough outward from the center to form a large oval-shaped ring, approximately 10 ½ x 7 ½ inches in size. Repeat this shaping process for the second dough ball.
-
Carefully transfer the shaped dough rings to the prepared baking sheets. Lightly cover them again with a kitchen towel or plastic wrap and allow them to rise for an additional 45 minutes. This second proofing is essential for the final light and airy texture.
-
Make the sugar paste: While the dough is completing its second rise, prepare the decorative sugar paste topping. In a medium bowl, combine the egg yolk, all-purpose flour, confectioners’ sugar, and softened unsalted butter. Beat these ingredients together until they are thoroughly combined and form a smooth, thick paste.
-
Divide the prepared sugar paste into 16 small, equal pieces and gently shape each piece into a thin strip. Refrigerate these strips until you are ready to use them for decoration.
-
Make the egg wash for the decoration: In a small bowl, whisk together one egg and one tablespoon of milk until completely combined. This will create a beautiful golden glaze on your roscas.
-
When you are ready to decorate and bake, preheat your oven to 350°F (175°C). Arrange the oven racks to occupy the middle and top positions.
-
Carefully uncover the risen doughs and generously brush the egg wash all over the surface of both roscas, ensuring an even coating for a beautiful shine.
-
Now, it’s time to decorate! Retrieve the chilled sugar paste strips from the refrigerator and lay 8 strips evenly spaced across each rosca. Arrange strips of guava or quince paste and the colorful candied cherries in the empty spaces, creating a festive and visually appealing design to your liking.
-
Place the roscas into the preheated oven and bake for approximately 25 minutes. To ensure even baking and a beautiful golden-brown finish, swap the location of the baking sheets (top to bottom) and rotate them halfway through the baking time. The bread is fully cooked when the tops are golden brown. Allow the baked roscas to cool on a wire rack for at least 30 minutes before proceeding.
-
Once the roscas have cooled completely, gently insert 1 to 2 Baby Jesus figurines into each rosca by pushing them through the bottom of the bread. Your festive Rosca de Reyes is now ready to be served and enjoyed!
Notes
Nutrition
Serving: 1slice
|
Calories: 347kcal
|
Carbohydrates: 47g
|
Protein: 8g
|
Fat: 14g
|
Saturated Fat: 8g
|
Polyunsaturated Fat: 1g
|
Monounsaturated Fat: 4g
|
Trans Fat: 0.5g
|
Cholesterol: 100mg
|
Sodium: 67mg
|
Potassium: 102mg
|
Fiber: 2g
|
Sugar: 14g
|
Vitamin A: 464IU
|
Vitamin C: 0.03mg
|
Calcium: 33mg
|
Iron: 2mg
Nutrition information is automatically calculated, so should only be used as an approximation.